Artificial intelligence can now become a seamless part of your team. With support for MCP (Model Context Protocol), you can integrate NetHunt CRM with AI.
This is more than just a chatbot for generating text - it's an AI assistant that understands the structure of your CRM. It can create new folders, add fields, automate routine tasks, and analyze your CRM settings based on your requests. Below, we'll show you how to set up this integration in just a few simple steps.
What can AI do when integrated with NetHunt CRM
Once connected via MCP, the AI gains secure access to your CRM system and can perform the following tasks directly via text chat:
- Manage the structure: create new folders for leads or deals.
- Customize the system to suit your needs: add new fields of various types (single-line, drop-down lists, etc.).
- Review settings: analyze the current CRM configuration and help optimize your business processes.
CRM actions you can perform using these AI integrations
Working with folders - folders in NetHunt are like entities (for example, ‘Leads’, ‘Companies’, ‘Deals’):
- View a list of all folders in your workspace
- View the detailed folder structure - which fields it contains and their types
- Create new folders with a default set of fields
- Edit a folder’s name
- Add new fields to an existing folder
- Update field properties (name, description, required status, etc.)
Working with records - refers to the records themselves (for example, a specific lead or deal):
- Create new records in a folder
- Retrieve a record by ID
- Update values in the record fields
- Delete records (these are moved to the trash bin and can be restored)
- Search for records using full-text search by relevance
- Filter records by structured criteria (specific fields + operators)
- Retrieve a list of records created or updated after a specific date
Interacting with the record timeline:
- View the activity history for a record – emails, calls, comments, chats, calendar events
- View the full content of a specific item from the timeline
With this functionality, you can:
- Find all deals at a specific stage
- Create a new lead with pre-filled fields
- Update a deal’s status
- View the communication history with a client
- Create a new folder tailored to your sales process
How to connect NetHunt CRM to Claude AI via MCP
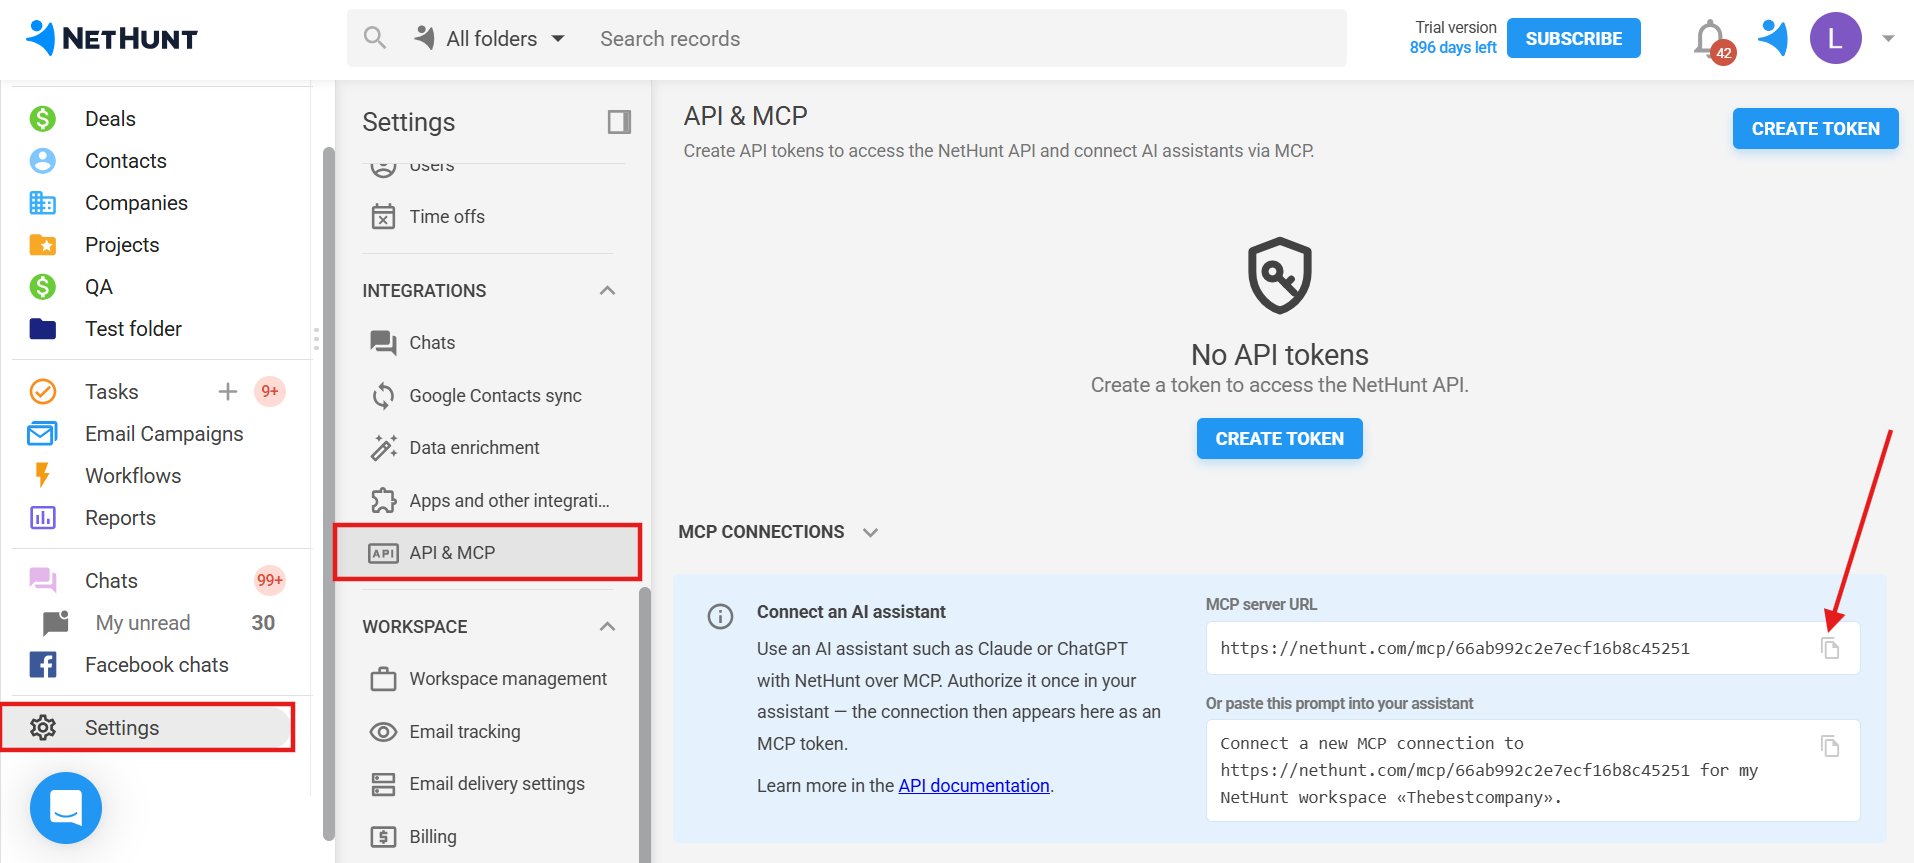
- Go to the NetHunt Settings>API&MCP>copy the MCP server URL:
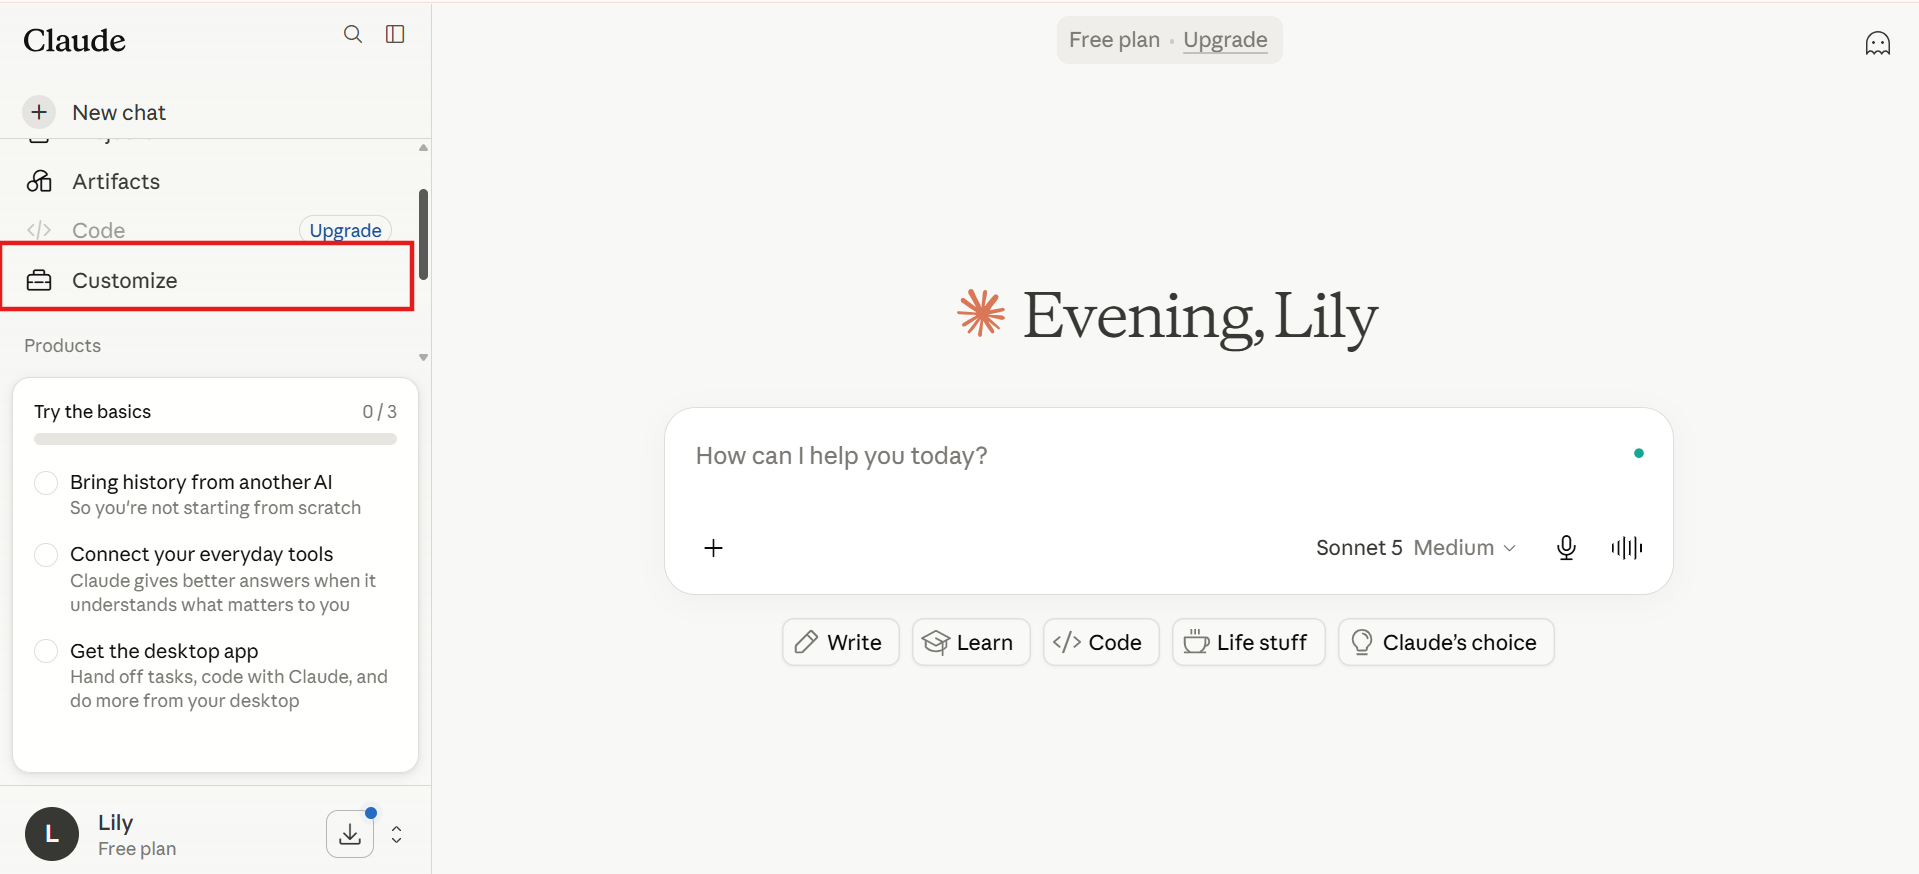
- Open Claude and log in to your Claude account. Click the "Customize" button:
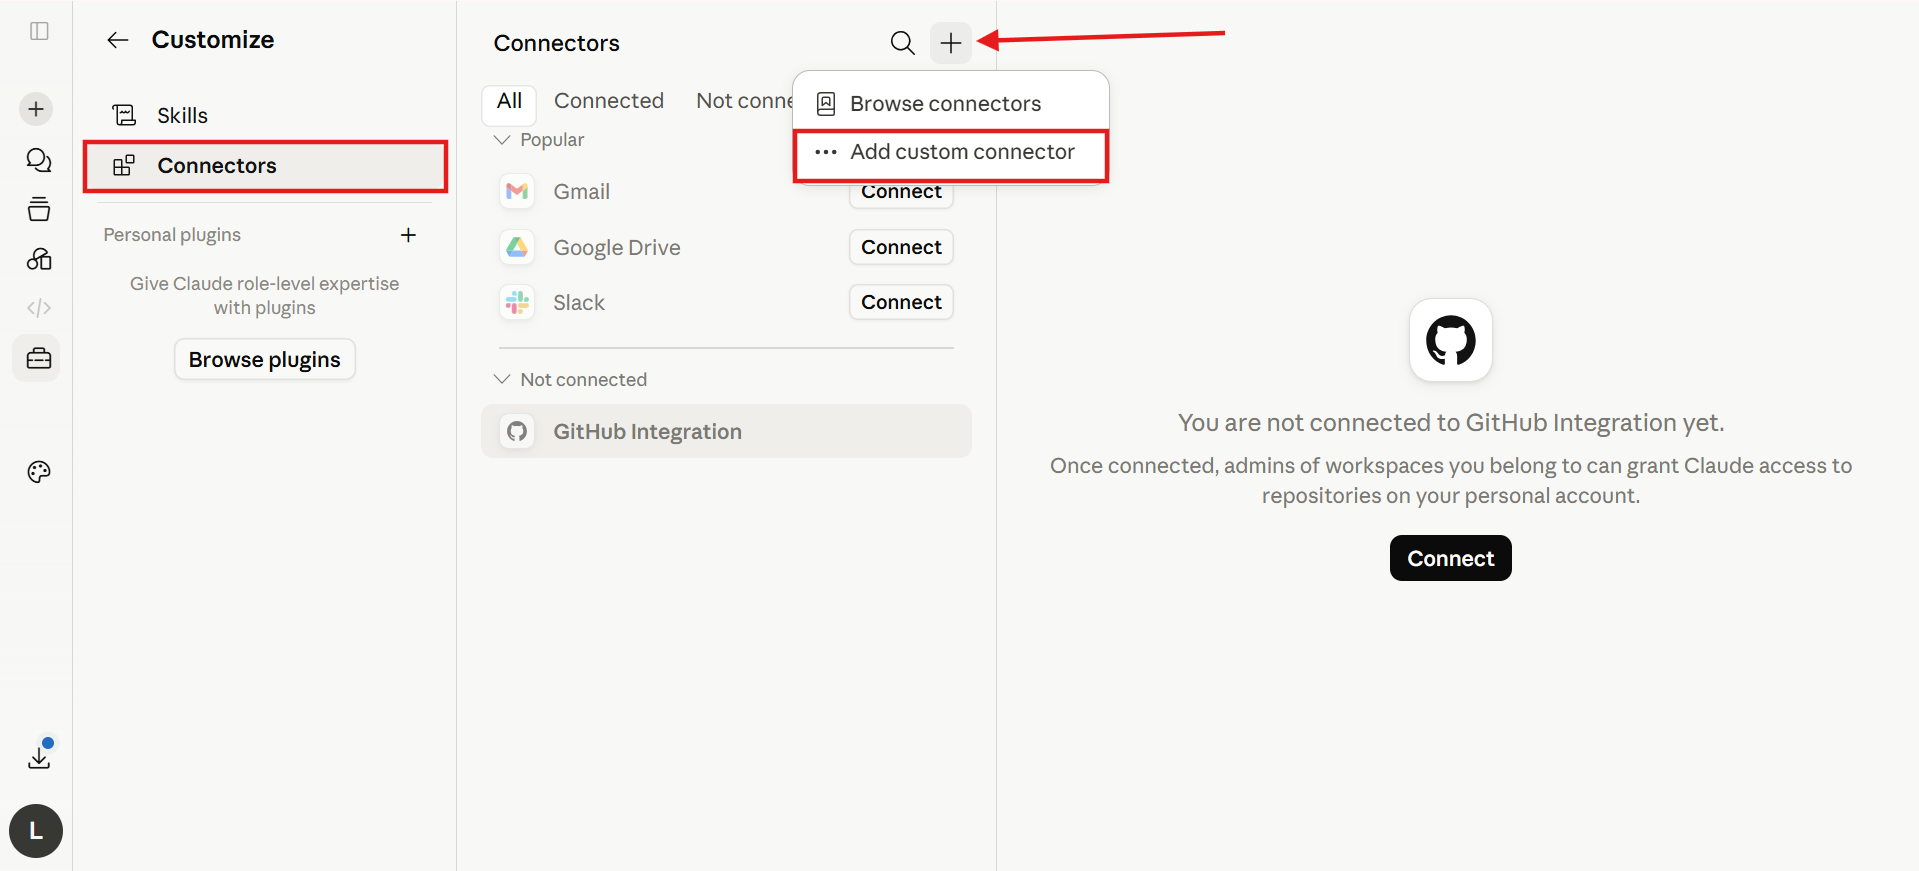
- Select Connectors, then click the "+" icon and select Add custom connector:
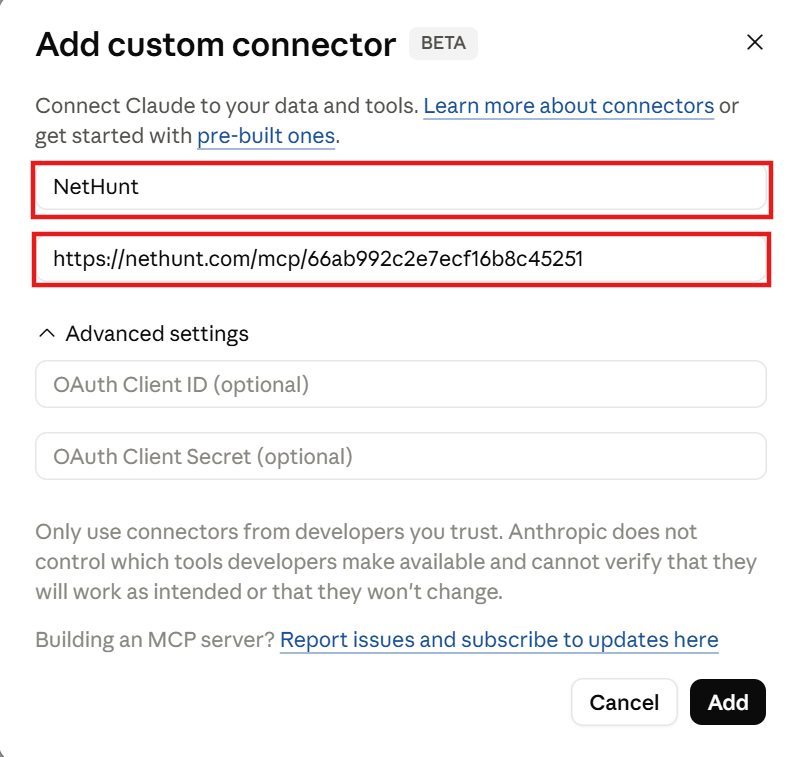
- Enter a name for the connector, paste the copied MCP server URL, and click Add:
- Click "Connect":
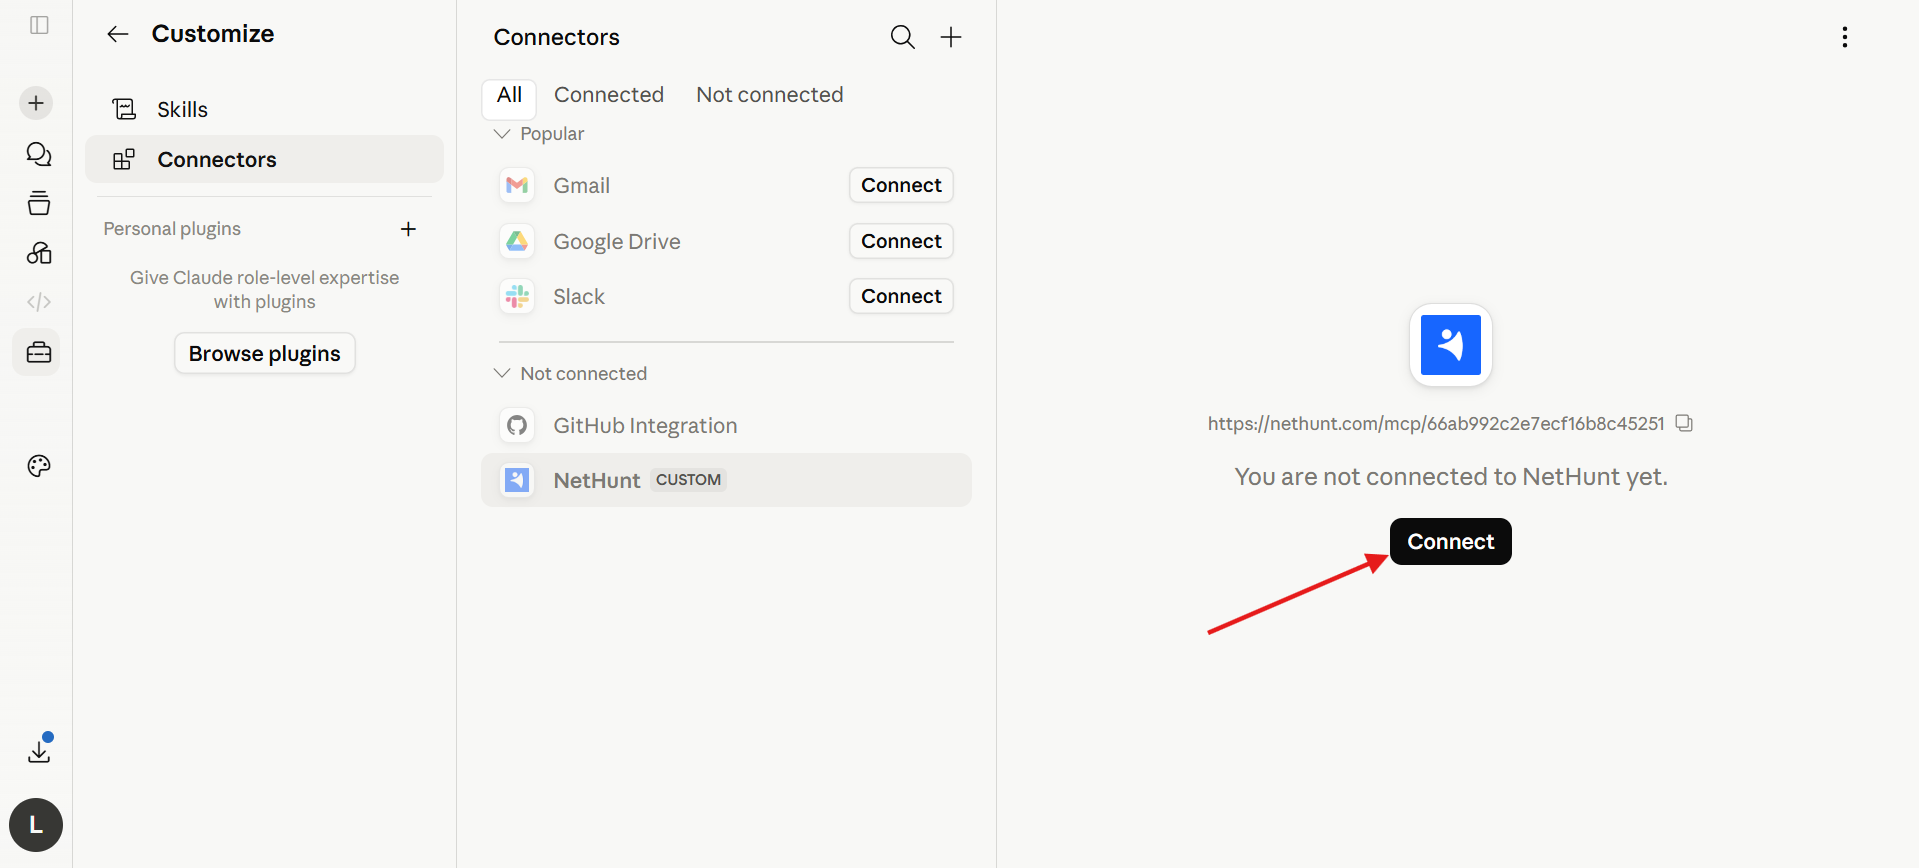
Congratulations, you have connected AI to your NetHunt workspace.
Managing permissions within Claude
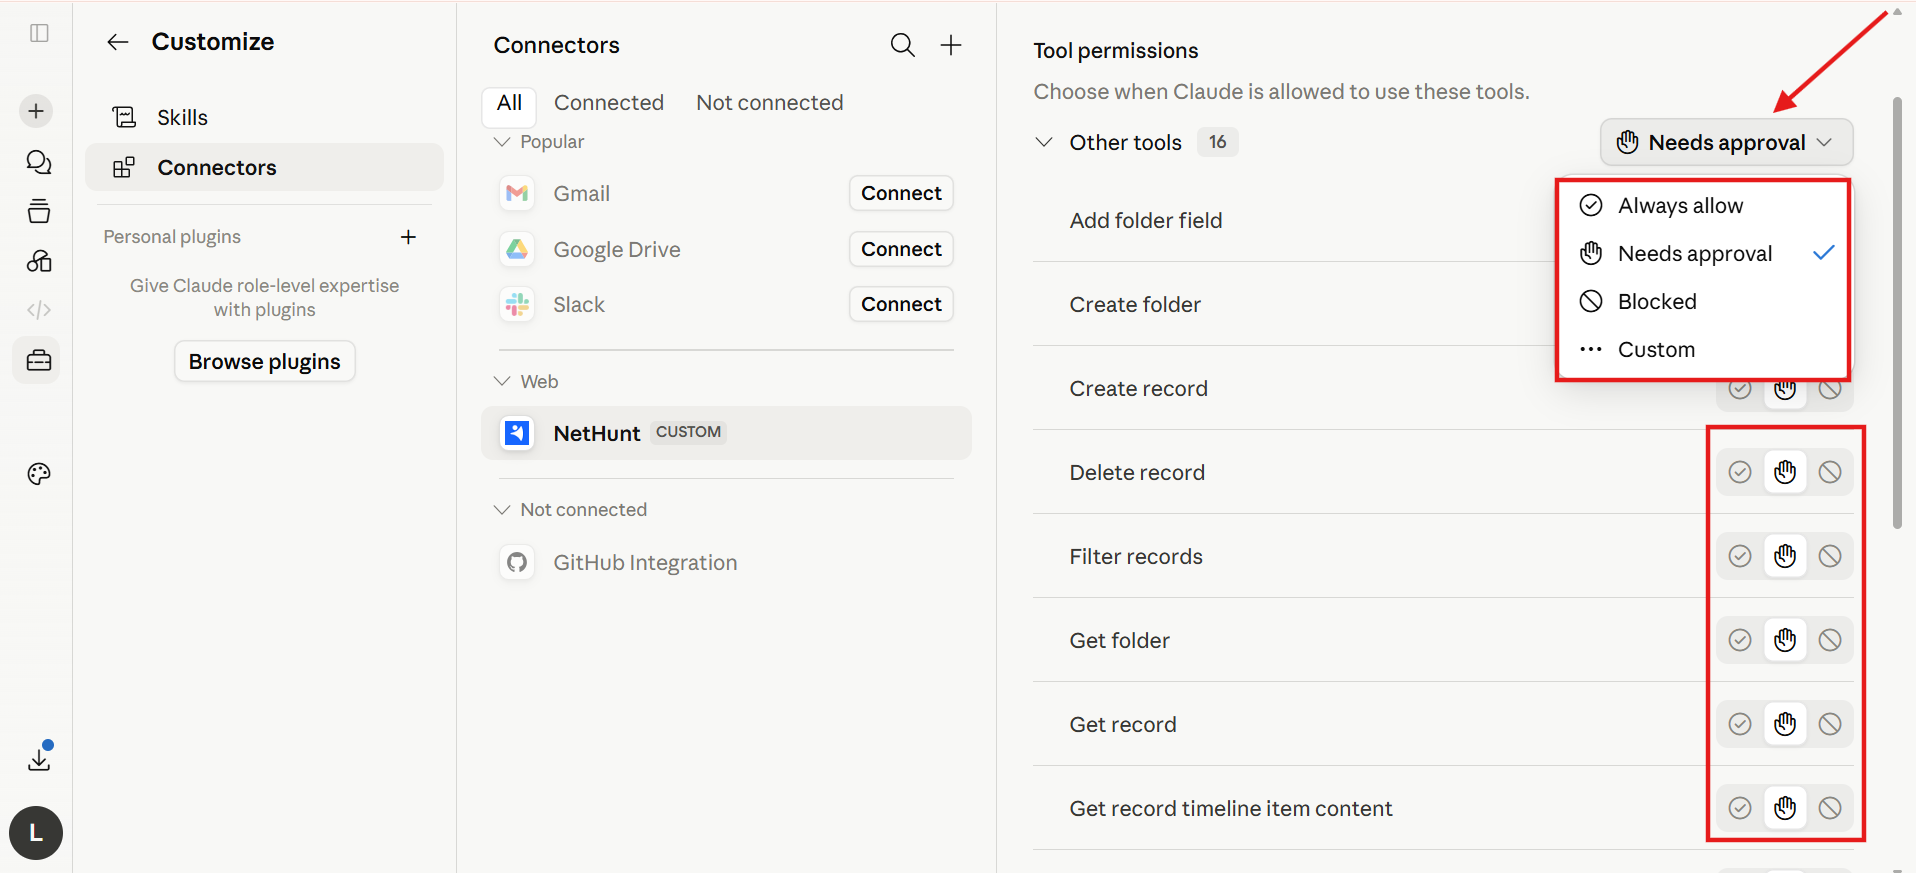
Once you connect NetHunt CRM via MCP, you'll see a new CRM connector in Claude. From there, you can easily control what Claude is allowed to do - whether it can perform certain actions automatically or ask for your approval first.
To configure these permissions, open the Connector Settings in Claude. You can choose one of the following access levels for each individual action or apply the same setting to all tools at once:
- Always allow ✓: Claude will carry out your commands instantly in the background. For example, if you say 'Create a folder', it will create it straight away in NetHunt CRM without asking any questions.
- Needs approval ✋: The safest mode for sensitive actions (such as deleting records). Every time you give Claude such a command, a 'Confirm' button will appear in the chat. Until you click it, the AI won't make any changes to your CRM.
- Blocked 🚫: A complete ban on the action. Even if you ask Claude in the chat to carry out this command, he will refuse, as access to this specific tool has been disabled in the settings.
How to connect NetHunt CRM to ChatGPT via MCP
- Log in to your ChatGPT account<click your profile icon<Settings:

-
Go to the Plugins<Developer mode<enable the Developer mode:


-
Go again to Plugins and click the "+" button:

-
Enter the name of the connection and paste the MCP server URL:

-
You'll see the window like this:

Click Sign in with NetHunt.
-
Congrats! The connection is ready:

Managing permissions within ChatGPT
Once the app has been successfully connected, it will appear in your list. You can flexibly control the extent to which ChatGPT can make changes to your workspace independently.
Go to the settings for the connected CRM NetHunt app and find the 'Permissions' section. By clicking on the drop-down menu, you can select one of four security modes:
- Always ask: ChatGPT will pause and ask for your approval before reading any data or making any changes.
- Allow reading: The AI will be able to freely read data (for example, search for contacts or view the folder structure) without asking, but any attempt to create or delete something will require your confirmation.
- Allow low-risk actions (default variant): ChatGPT will automatically approve safe, routine tasks, but will block or request confirmation when attempting to perform sensitive operations.
- Allow all actions: Full carte blanche for the AI. ChatGPT will carry out any of your commands (including deleting records or changing the structure) instantly in the background without further confirmation.

How to connect NetHunt CRM to Grok via MCP
- Log in to your Grok account<Open Skills and Connectors<Connectors<New Connector:
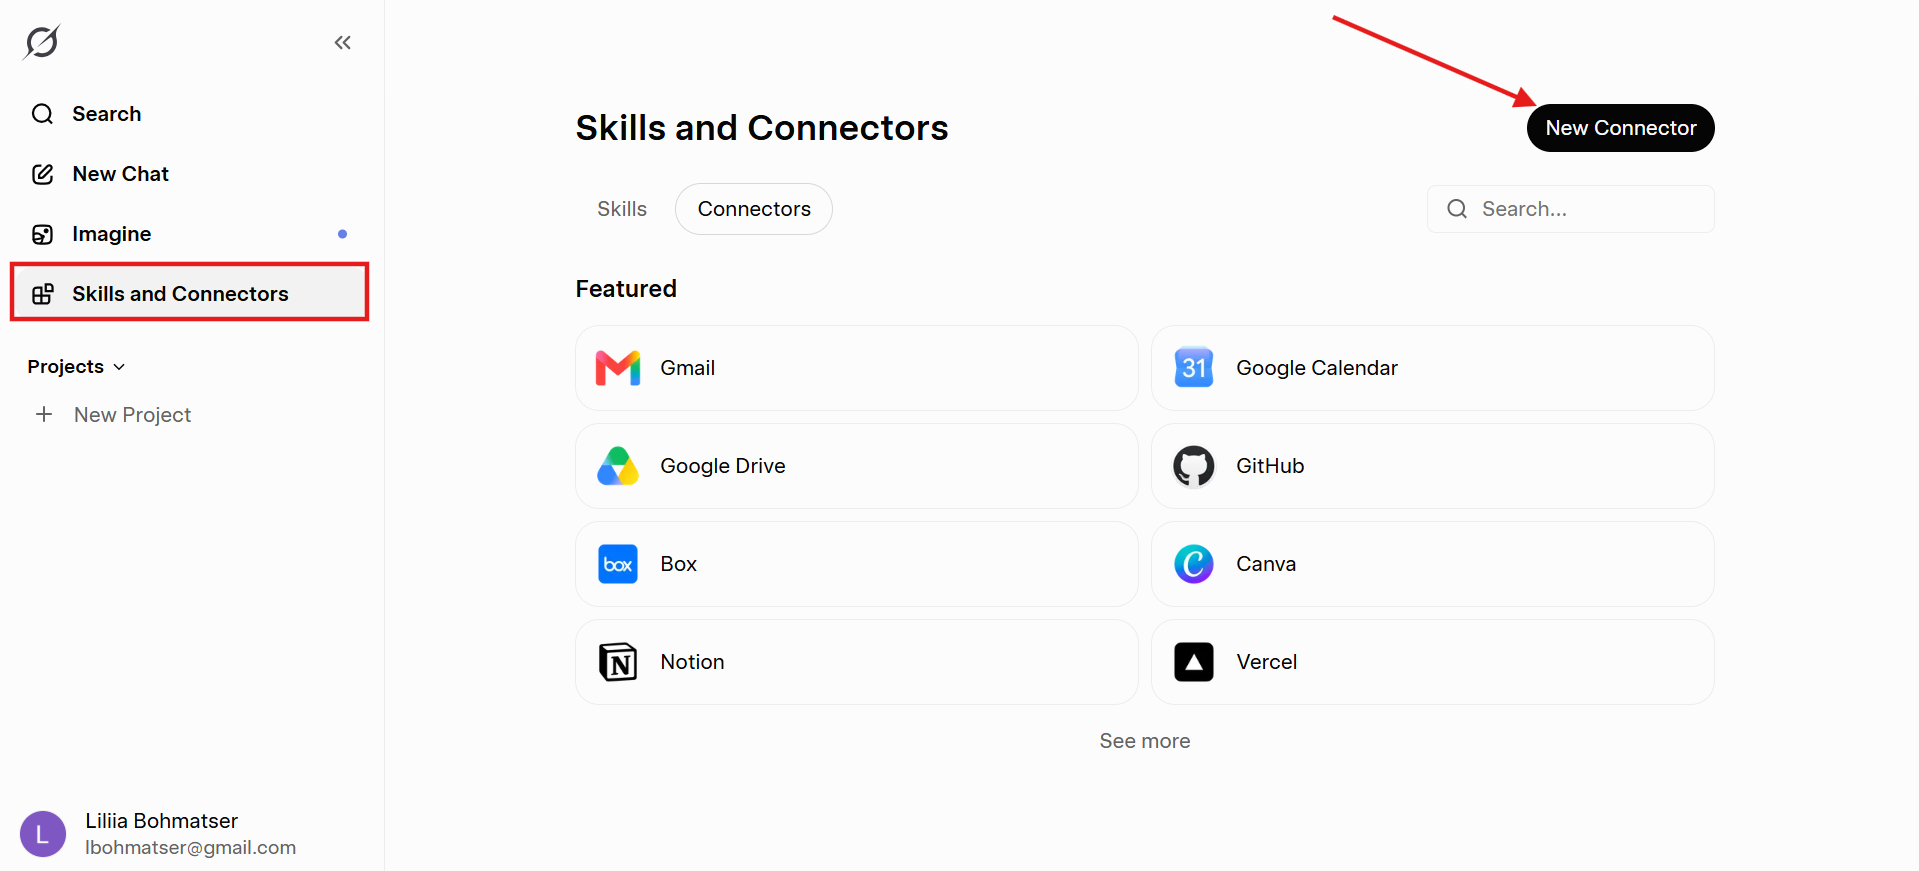
- Choose Custom connector:
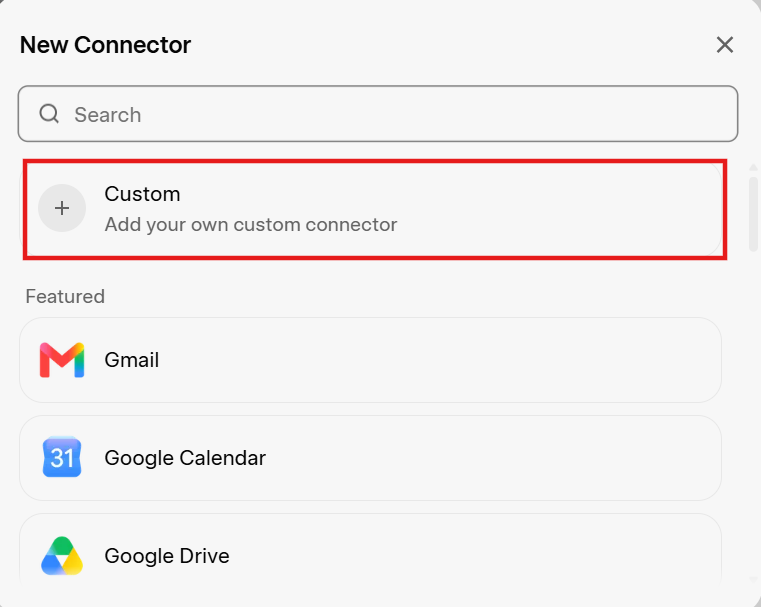
- Enter the name of the connection and paste the MCP server URL:
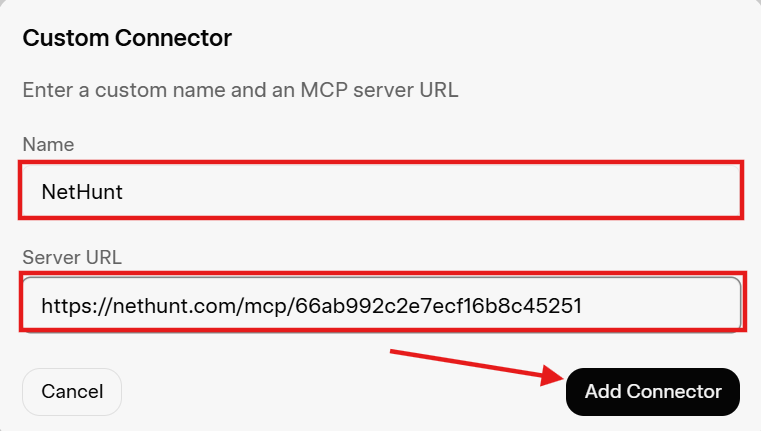
Once added successfully, a card for the connected NetHunt CRM connector will appear.
Grok will automatically recognise and enable all available functions (tools) provided by the NetHunt MCP server. You will see a list of activated tags:
- add_folder_field (creating fields in folders)
- create_folder (creating new folders)
- create_record / delete_record (working with records)
- list_folders (viewing the list of folders) and others.
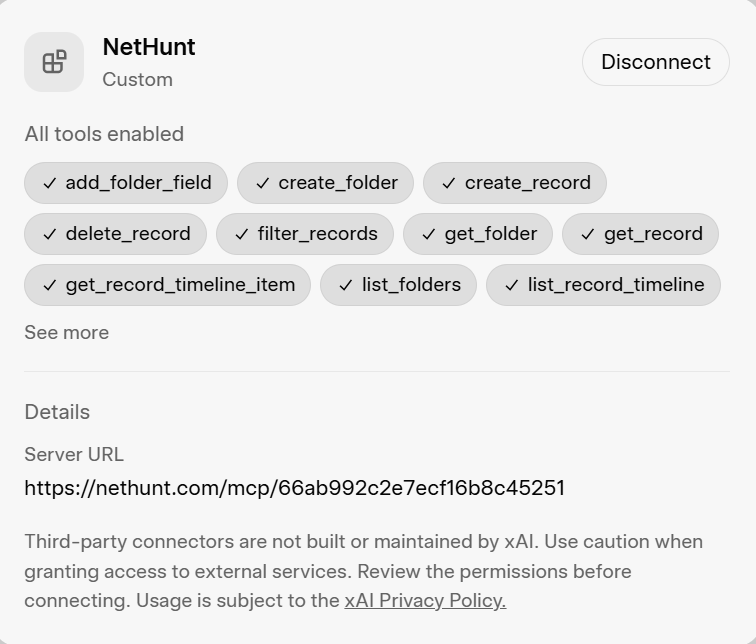
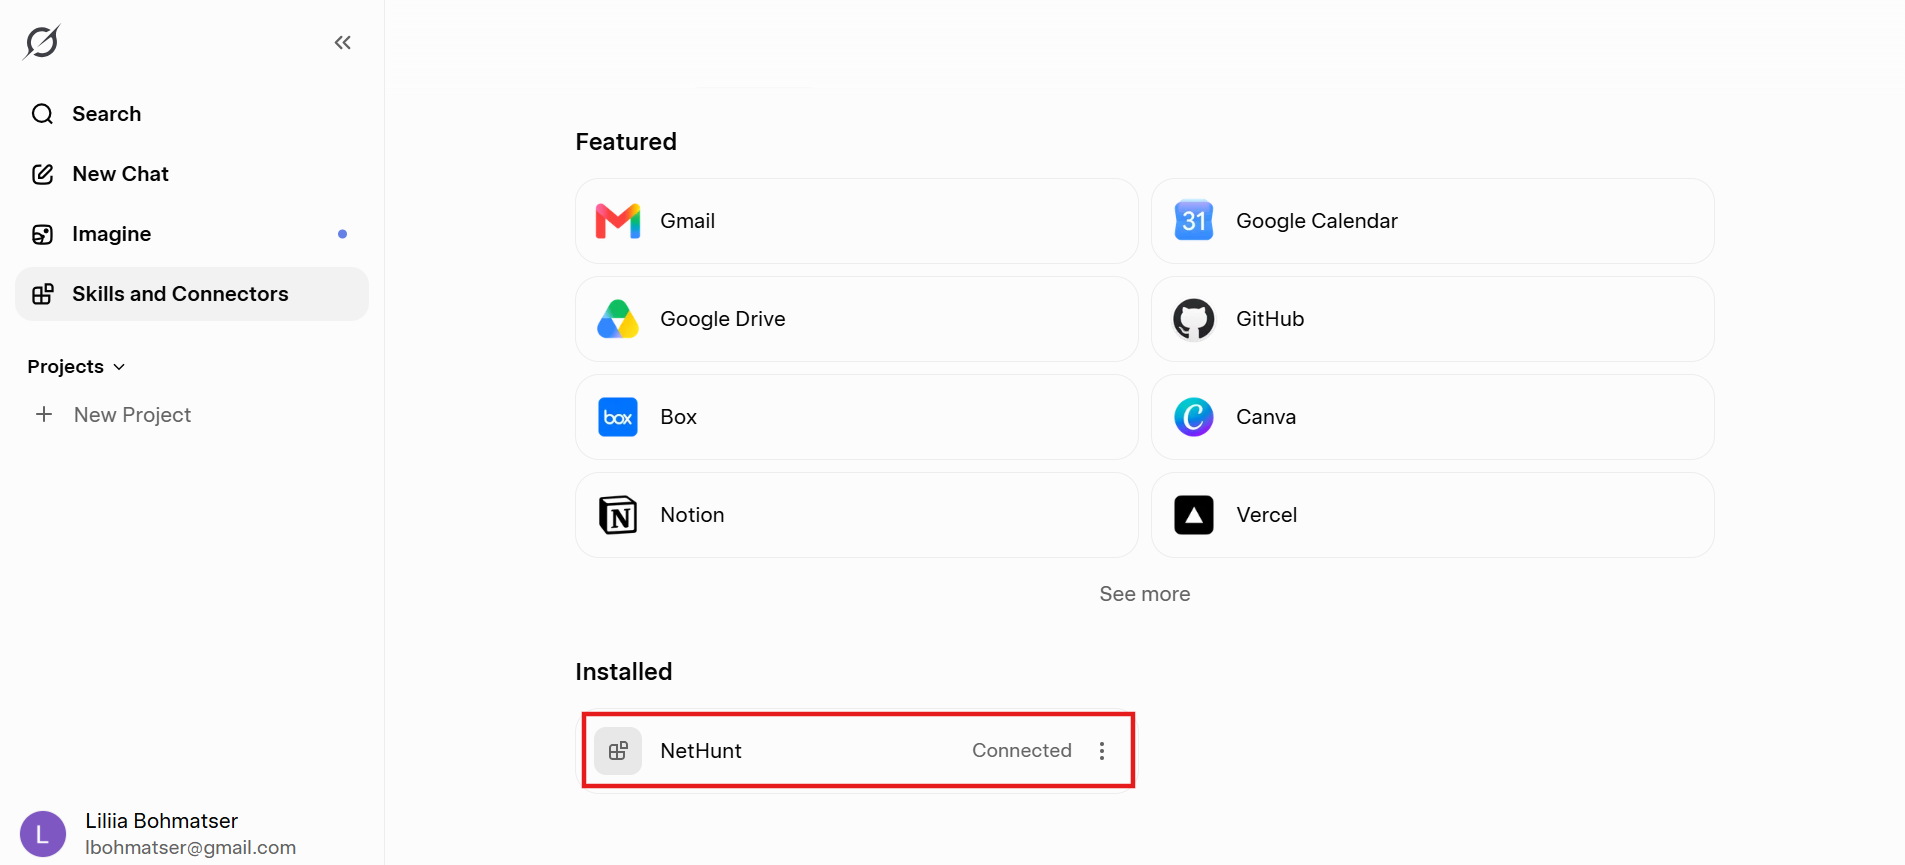
- That's it! You've successfully connected NetHunt to Grok:
How to Disconnect the MCP Integration
- Go to the NetHunt Settings>API&MCP>find the connection you want to disable>Click "Settings":

- Click the "Revoke token" button:
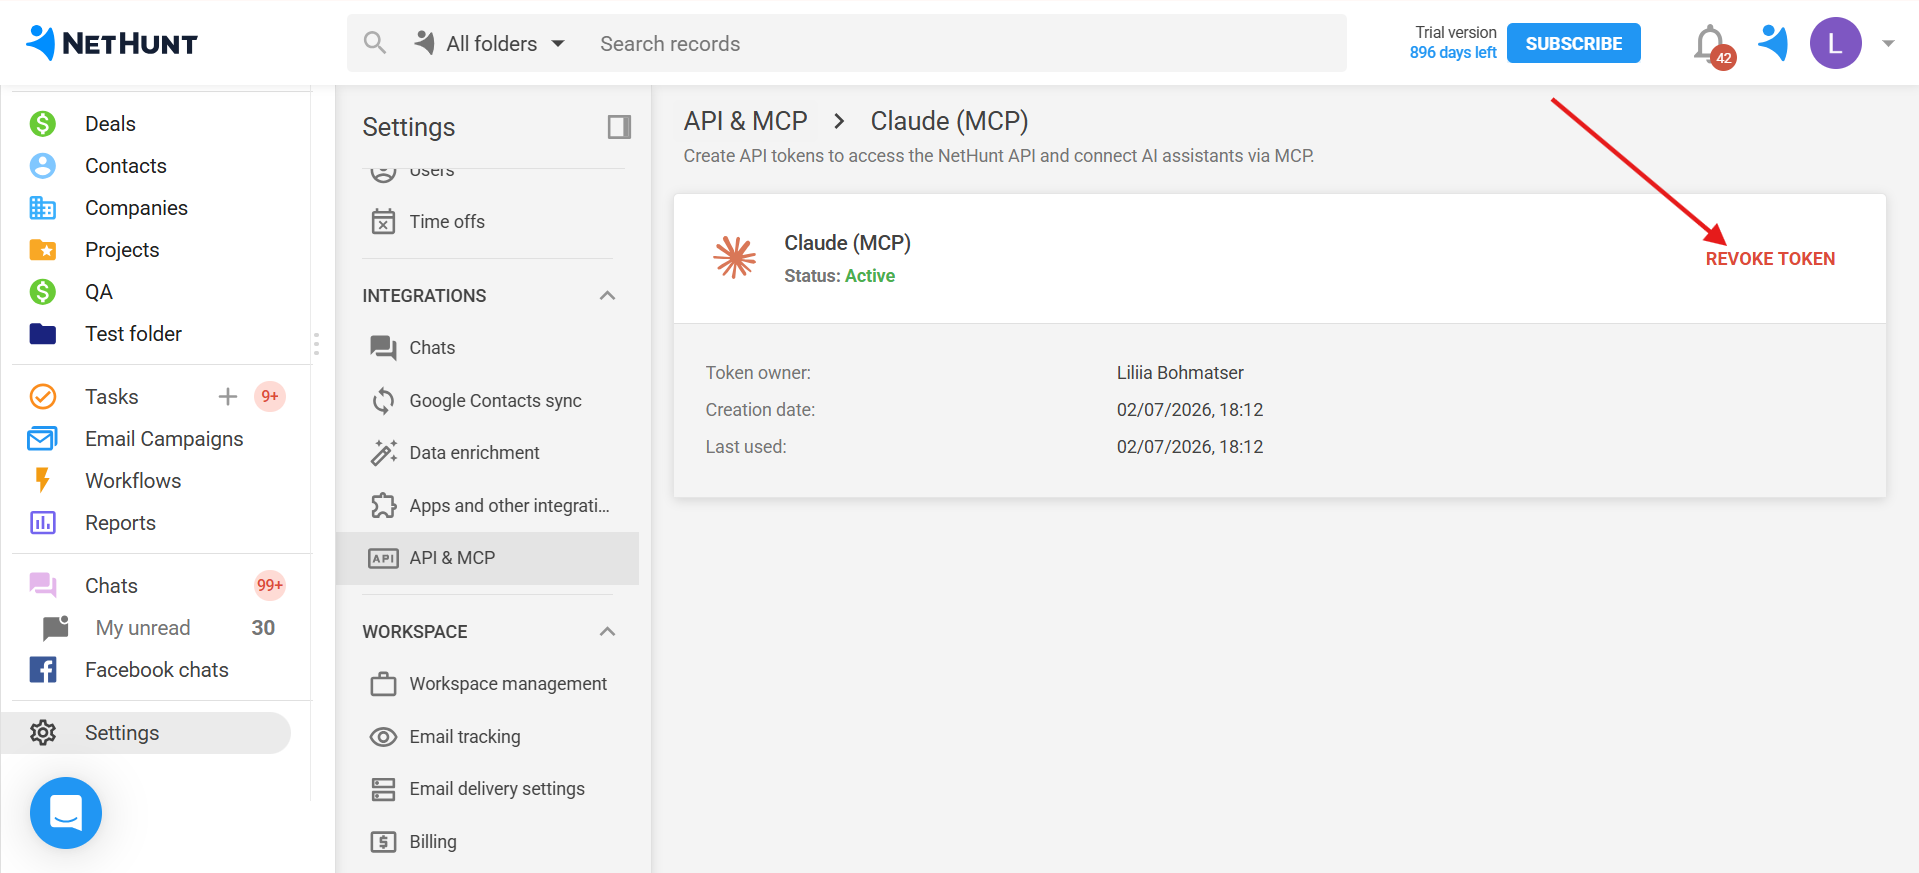 After that, the AI assistant will immediately lose access to your CRM system, and any attempts it makes to execute commands via the MCP server will result in an authorisation error. If you wish to reconnect it, simply generate a new token.
Please note: Currently, NetHunt CRM integration via the MCP server is supported only for Claude AI, ChatGPT, and Grok. Google's Gemini text assistant does not currently have built-in support for the MCP (Model Context Protocol), so it is not yet possible to connect it this way. Our team is actively monitoring updates from Google. As soon as Gemini adds MCP support, we'll be the first to release an update and add instructions to this page!
API and MCP usage limits
As the AI communicates with NetHunt CRM via API requests, the integration is subject to the standard limits of your workspace. Each action performed by the assistant (for example, creating a folder, searching for a contact, or adding a field) counts as a separate request.
All limits are shared across all tokens in your workspace, meaning these are per-workspace (not per-user) limits. You can check your current usage status in the same section: Settings>API&MCP>API USAGE section:
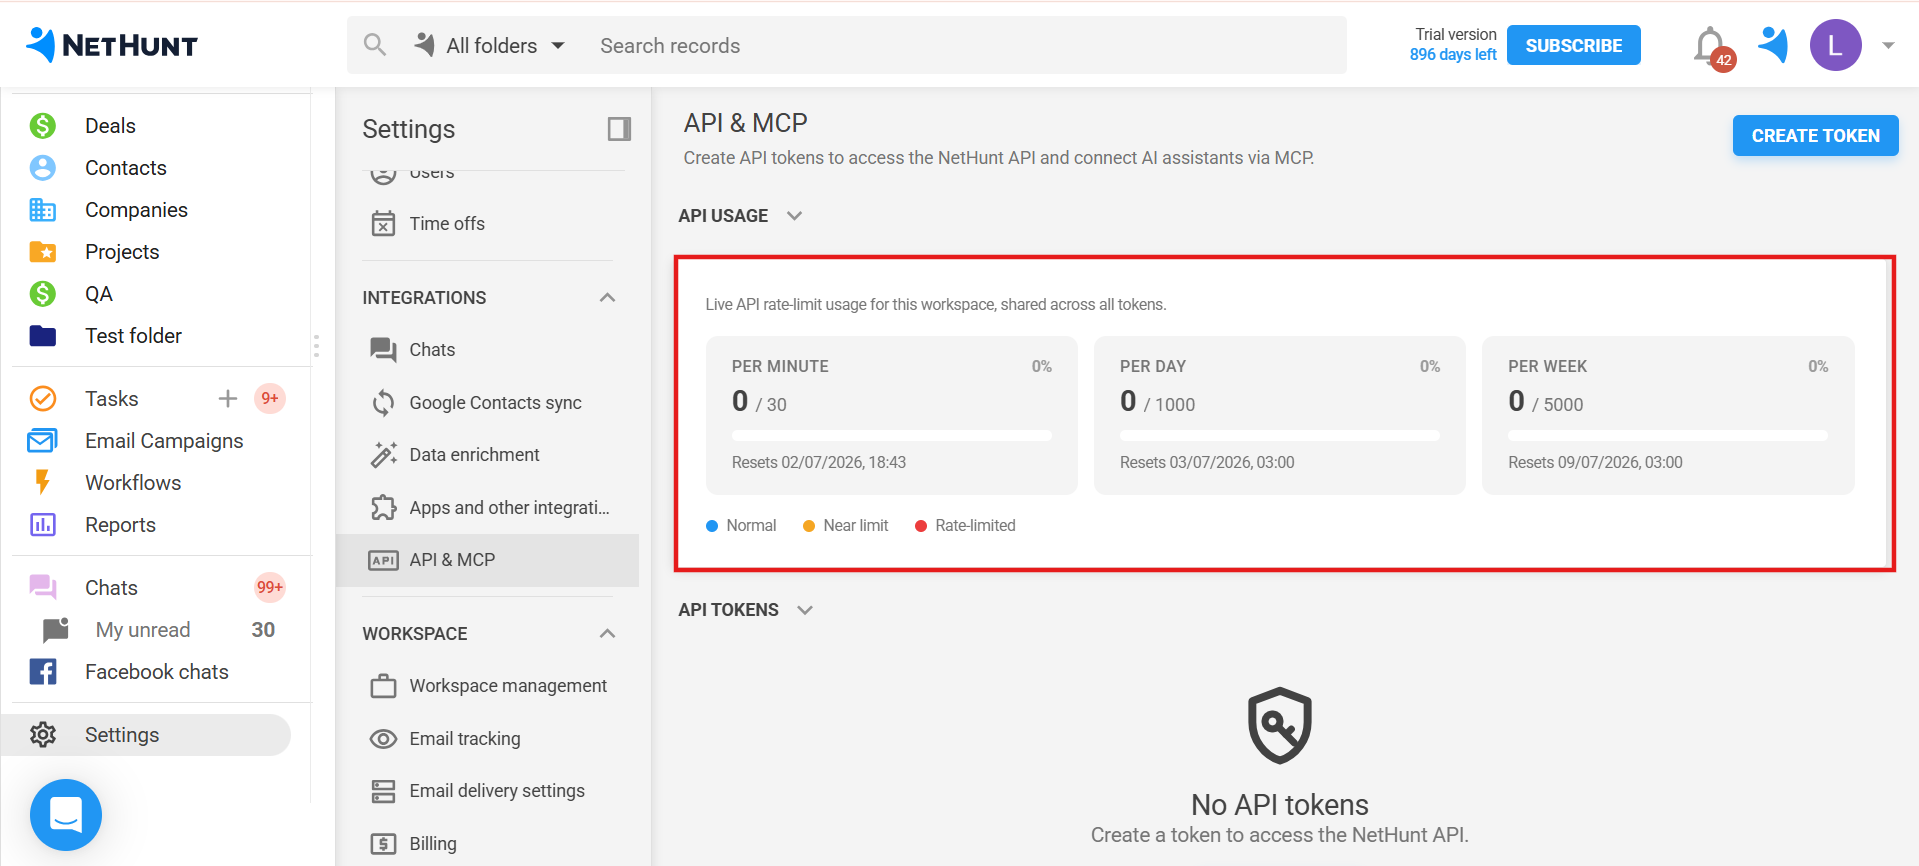 Limitations on NetHunt CRM pricing plans

Please note: If the limit is exceeded, the response will return error code 429.
There are three limit categories:
- Per minute: it resets automatically every minute. This limit protects the system from overload if you give the AI too many small tasks at once.
- Per day: it is reset daily at 03:00.
- Per week: it is reset once a week (the exact time and date of the next reset are always displayed on the limit banner).
Monitoring usage limits
For your convenience, we've added colour-coded indicators:
🔵 Normal – you're using the API within the safe zone; everything is working perfectly.
🟡 Near limit – Claude is working hard; the limits are almost exhausted. You should reduce the frequency of large requests.
🔴 Rate-limited – the API has been temporarily suspended. Claude will not be able to execute commands in the CRM until the limit resets (the reset time is shown below each counter).
Haven't found the answers you're looking for? Ask our Users Community.
